Acoustic or popcorn ceilings were once trendy in the 1960s and 1970s. These textured treatments were popular primarily due to economic reasons. Acoustic ceilings helped to absorb sound from above, cover imperfections, and save money since they eliminated the need for a paint job. They were also excellent fire retardants.
But like many trends, acoustic ceilings have fallen out of favor, and many households want to eliminate them. Besides looking outdated, acoustic ceilings can be dangerous to your health. Before the 1980s, asbestos was the main ingredient used to make popcorn ceilings, and older homes with popcorn ceilings are likely to be made with asbestos. Asbestos exposure can cause adverse health effects ranging from asthma to lung cancer.
With the ever-increasing numbers of asthma and allergy sufferers, acoustic ceilings are on the way out. By removing them, you can make your home look more modern and safer. Removing outdated acoustic ceilings can be laborious, time-consuming, and risky. That’s why there are professionals like Custom Painting Inc.
Testing your acoustic ceilings for asbestos
Before you begin this project, you will need to determine whether your popcorn ceiling contains asbestos. If you suspect your home’s acoustic ceiling has asbestos, purchase a DIY test kit from the hardware store and send the samples to an accredited testing lab. When you obtain samples from your acoustic ceiling, wear the appropriate safety gear, like a pair of goggles or other eye protection, and a ventilator or dust mask.
If you don’t want to go the DIY test route, the other method is to have your acoustic ceiling tested by a professional.
Prep work
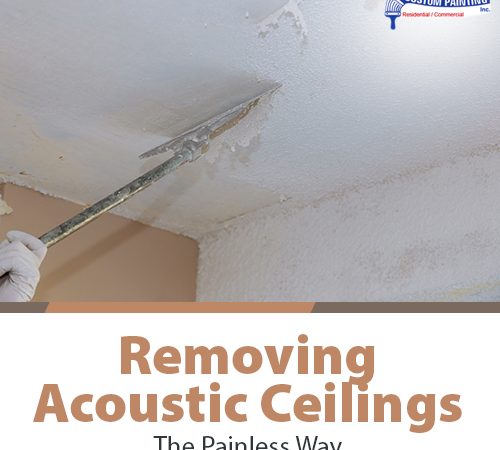
If your acoustic ceiling tests zero for asbestos, you might want to remove it yourself. Fortunately, the method is not at all complex and doesn’t require fancy tools. However, scraping the ceiling’s textured surface can be pretty messy. It’s impossible not to create a mess as you scrape away the unwanted acoustic ceiling, so it requires solid prep work.
- Gather your tools, such as a garden sprayer, a wide putty knife or taping knife, painter’s tape, plastic sheeting, drop cloths, and a step ladder.
- Since you will be working overhead, wear the proper safety gear mentioned earlier.
- Remove furniture from the room.
- Seal the walls with painter’s tape and plastic sheeting.
- Cover the floor with drop cloths.
- Turn off your room’s power.
- Remove lighting, fans, chandeliers, or anything attached or hanging from the ceiling.
- Keep the space well-ventilated.
Removing acoustic ceiling (no asbestos)
The scraping should be done without trouble if the acoustic ceiling contains no asbestos, apart from encountering dust and debris.
- Use a garden sprayer filled with water to wet a small area (preferably four-by-four-foot) of the ceiling. This is to make scraping the textured material easier (don’t soak it, though, as doing so could damage the sheetrock over it).
- Start scraping.
- Once you’re done scraping, check the ceiling for damage, such as holes, dents, gouges, or damaged drywall tape. Do the necessary repairs to ensure the ceiling is in good shape before painting.
- If there are visible nails, joints, or screws, you may have to cover them with a joint compound. Let the compound dry, then sand the excess.
- Prime the ceiling. Let the primer dry completely.
- Paint the ceiling.
- Once the paint job is finished, remove the painter’s tape and plastic sheeting. Reinstall the lights and fans and put back the furnishings.
Removing acoustic ceilings – a process best left to professionals
Whether or not your acoustic ceiling is confirmed to have asbestos, hiring a licensed professional house painter in the Bay Area is highly recommended. You can have the acoustic ceiling covered with new drywall or paneling or, better yet, the texture removed and the ceiling repainted.
Removing acoustic ceilings is quite time-consuming and labor-intensive. It also involves an immense deal of preparation. Custom Painting, Inc. has experienced professional painters and carpenters who will do the job right the first time.
Our crew begins by covering everything in the work area in plastic and drop cloths, including the walls, floors, and all furniture. You don’t have to pay extra for that. Next, our painters scrape all the textured material off, do the necessary repairs on the ceiling, and start sanding them. Once the ceiling is sanded, it is now ready for priming, texturing, and painting. Knockdown and orange peel are among the most requested textures when updating the look and feel of a home.
But our professionals are not done yet. They also make sure to leave your space clean and tidy. All dust and debris are discarded, and the lighting, décor, and furnishings are put back in place – all at no extra cost.
You might wonder, how long does it all take? Well, it’s done in a fraction of the time it has taken you to decide whether it’s time to get rid of your acoustic ceiling in the first place! An average home takes around 2 to 3 days for the entire process. You can count on us at Custom Painting, Inc., as we are very flexible with working around scheduling issues. We even come in on weekends if needed.
What’s more, our painters are licensed, bonded, and insured. “Trustworthy” is our middle name, meaning you don’t have to be in and keep an eye on our crew for three days in a row. That’s what our foremen and supervisors are there for.
Most companies remove the acoustic ceiling and texture but not prime and paint. Not so with the best painters in the area, such as Custom Painting, Inc.! We offer competitive rates on acoustic ceiling removal, texture, and paint. You will get all these services for one price!
Why browse through a sea of web pages of multiple contractors when Custom Painting, Inc. is just a phone call or message away? Contact us now to receive an estimate, which is free (and will always be)!
